Step 1: Remove the Seat
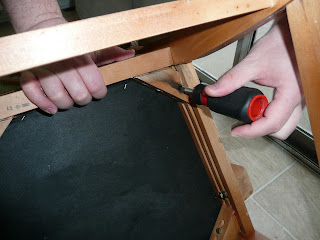
Turn the chair upside down and there should be four screws, one in each corner of the chair. Unscrew the screws and keep them in a safe place for later. Once you have done this the seat should just fall right off, and if it does not you may have to hit it a little to loosen it up then remove it.
So simple my 18 month old daughter attempted to do it, it really is super easy!
Step 2A: Remove the Arm Rests (Optional)
I wanted the arm rests removed from my chairs because they were broken beyond repair, but if you want to keep the arm rests then don't remove them. To remove the arm rests I had to unscrew two bolts located in the frame of the seat by the arm rest. Every chair is different but the bolts should not be to difficult to find, if your not sure you can always just start unscrewing things and see what falls off, and if it was wrong screw it back on till you find the right part.
Step 2B: Remove the Arm Rests (Optional)
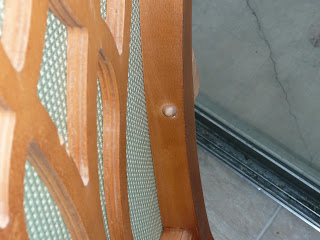
Next step in removing the arm rest is to locate the screws for the top part of the arm rest, usually located on the back rest part of the chair. As you can see from the photo I had to remove these small wooden pegs before I could unscrew the the screw. I tried a few different ways to remove them, all of them were effective. #1 I used the part of a hammer that you use for removing nails and pried it off (this did leave so big gash marks in the chair, don't worry I'll show you how to fix that). #2 I took a flat head screw driver and pried it off. #3 I took a hammer and hit it until it broken into two pieces and pulled it out. I'm not going to lye #3 was the easiest. Once you remove all the screws the arm rests should fall right off. On some of the chairs it got stuck a little I just took the hammer and hit it tell it fell off.
Step 3: Remove the Back Upholstery
To remove the upholstery I took a knife and cut into the fabric, then ripped it off. Most it comes off pretty easy, if it gave me trouble I took a pair of needle nose pilers grabbed ahold of the trouble area, twisted and pulled, twisted and pulled. Once all the fabric was off, the form came right out, leaving this back stuff and the back fabric which were stapled on.
Step 4: Removing the Black Stuff, the Very Back Fabric, and the Million of Staples
I found it easiest to remove this stuff in layers not all at once, starting with the black stuff, then the fabric, then all the left over staples. The process is the same for the black stuff and the fabric. When removing this stuff I found it was easiest to cut a hole in it allowing me something to hold onto, then I would pull the black stuff or the fabric as much as I could. This will loosen up the staples. Once you find a staple that is loosened I used needle nose pilers to grab the staple and pull it out. Sometimes if it was a little more stuck I would use a flat head screw driver to loosen it up then pull it out with the pilers. Then I continue this process until all the black stuff and the fabric is removed from the chair.
Once that is done you will find that there are still a ton more staples left in the chair. You have to remove them all others wise they will show in your chair and that is no good. I used the same techniques as above loosen them with the flat head and pull them out with the pilers. It does take a very long time, and wearing gloves does help minimize the blisters.
Don't worry about marking up your chair while removing the staples, it happens and it is really easy to fix. As you can see below I marked mine up a ton, it really looked bad after I was done removing all the staples.
Step 5: Fixing all the Cracks, Ding Marks, Holes, etc.
You will need a Wood Filler any brand will do, I used Elmer's brand. Just take a putty knife and spread it into your holes, cracks, and any marks. Don't worry at this point about making it look pretty just get it on there. Once it is everywhere you need, then let it dry according to the directions on the container. I had to let mine dry for 6 to 12 hours. Then I sanded it smooth and applied a second coat. After the second coat dried I sanded it smooth as well and ensure the chair looked the way I wanted it. So that no bumps or nicks would show any that you have at this point will show up after you paint so sand it and fill it in with wood putty as much as you have to get it looking the way you want.
Step 6: Ready for Paint
This is how my chair looked once it was ready for the paint, it's not pretty but it is smooth.
I will post Part 2: The Painting and Upholstery of the Seat Next Week, if the weather holds up.


